本文为卷积神经网络的进阶版使用使用技巧,包括1*1、全局平均池化等操作进行各种模型优化,并采用对比实验的方式来对效果进行直观展示。
1*1卷积的使用 在使用卷积神经网络进行大量卷积运算时,最常用的优化方法就是采用1*1的卷积核降低kernel,然后再使用卷积较大的卷积核进行卷积。该方法来自于Google提出的Inception模型,在该模型的模型优化中,作者针对采用多个并行的卷积核所产生的参数过多的问题,提出在深层卷积之前先采用1*1的卷积进行降channel,然后再使用想要的卷积核进行卷积,在达到相同效果的前提下显著降低网络参数数量。
原理 对于输入数据维度为($B_i,C_i,W_i,H_i$)的卷积神经网络使用为($C_f,W_f,H_f$)的卷积核进行特征提取,卷积层网络参数的计算公式:
以输入数据维度(128,24,50,50)、使用卷积层为(48,3,3)为例,直接使用卷积层参数个数为:
而如果在使用该卷积核之前先使用一个(12,1,1)的卷积核进行降channel到12,那么该部分的参数个数为:
参数数量下降了近一倍。
对比实验 本文的对比实验采用以前自己写的一个模型进行实验,进行实验,原始模型结构如下:
1
2
3
4
5
6
7
8
9
10
11
12
13
14
15
16
17
18
19
20
21
22
23
24
25
26
27
28
29
30
31
32
33
34
35
36
37
38
39
40
41
42
43
44
45
46
47
48
49
50
51
52
53
54
55
56
57
58
59
60
61
62
63
64
65
66
67
68
69
70
71
class Char_CNN (nn.Module) : def __init__ (self,num_embeddings,embedding_dim,channel=1 ,feature_size=300 ) : """ Parameters: ------------- channel: 深度、通道数 feature_size: 特征向量大小 """ super(Char_CNN,self).__init__() self.embedding = nn.Embedding(num_embeddings,embedding_dim) self.feature_size = feature_size self.cnn1 = nn.Sequential( nn.Conv1d(channel,24 ,(3 ,embedding_dim),padding=1 ), nn.BatchNorm2d(24 ), nn.ReLU(inplace=True ), nn.MaxPool2d(2 ) ) self.cnn2 = nn.Sequential( nn.Conv1d(24 ,48 ,3 ,padding=1 ,), nn.BatchNorm1d(48 ), nn.ReLU(inplace=True ), nn.MaxPool1d(2 ) ) self.linear1 = nn.Sequential( nn.Linear(feature_size//4 *48 *2 ,128 ), nn.Dropout(0.3 ), nn.BatchNorm1d(128 ), nn.ReLU(inplace=True ) ) self.linear2 = nn.Sequential( nn.Linear(128 ,2 ), nn.Dropout(0.3 ), nn.BatchNorm1d(2 ), nn.Softmax() ) def forward (self,x) : """ x: (batch_size,feature_size),默认为channel为1 (batch_size,channel,feature_size) ,channel要与初始化时一致 """ if x.dim()==2 : x = torch.unsqueeze(x,1 ) sample_nums = x.shape[0 ] x = self.embedding(x) cnn1_output = self.cnn1(x) cnn1_output = torch.squeeze(cnn1_output) cnn2_output = self.cnn2(cnn1_output) cnn1_output = cnn1_output.view(sample_nums,-1 ) cnn2_output = cnn2_output.view(sample_nums,-1 ) cnn_output = torch.cat([cnn1_output,cnn2_output],dim=1 ) x = cnn_output.view(sample_nums,-1 ) x = self.linear1(x) x = self.linear2(x) return x
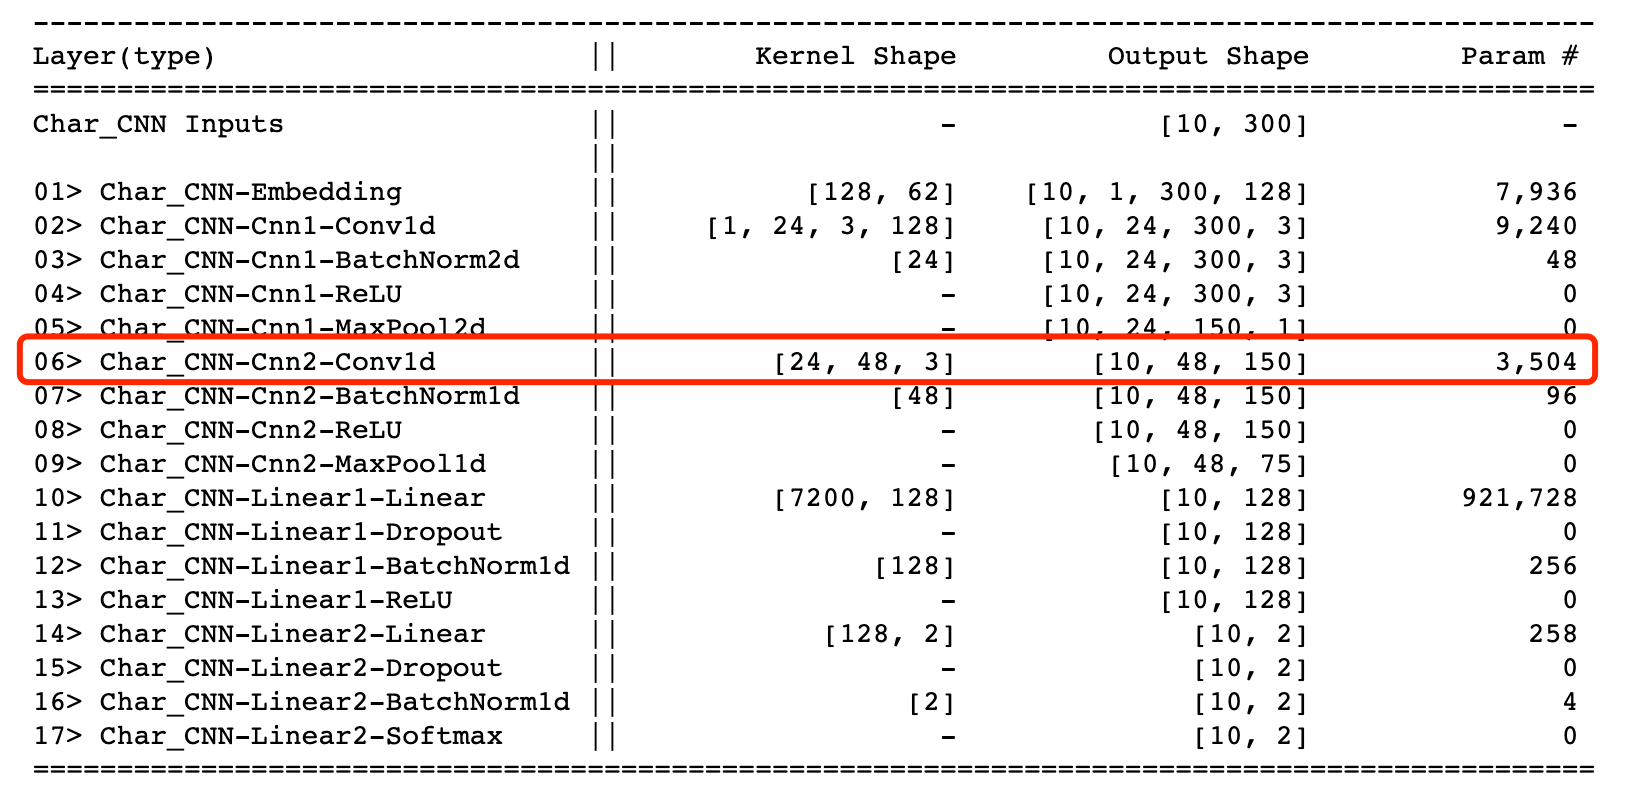
网络各层参数情况为:
使用1*1卷积核对上述网络中的卷积部分进行优化,在第二个卷积核前面增加一个(12,1)的卷积核进行降维(下图中略去BN、ReLu、等层,详细结构可以看下面的代码)
1
2
3
4
5
6
graph TB Embedding--> Conv1d(Conv 24,3*3) --> Conv2d(Conv 48,3*3) -->Linear1(Linear)-->Linear2(Linear) Conv1d(Conv 24,3*3)-->Linear1(Linear) Embedding2(Embedding)--> C1(Conv 24,3*3) --> C_aa(Conv 12,1*1)-->C2(Conv 48,3*3) -->L1(Linear)-->L2(Linear) C1(Conv 24,3*3)-->L1(Linear)
为什么在第一个卷积核上也应用1*1卷积核降channel技巧?
因为该卷积核原始深度已经为1,无法进行降channel
模型结构如下:
1
2
3
4
5
6
7
8
9
10
11
12
13
14
15
16
17
18
19
20
21
22
23
24
25
26
27
28
29
30
31
32
33
34
35
36
37
38
39
40
41
42
43
44
45
46
47
48
49
50
51
52
53
54
55
56
57
58
59
60
61
62
63
64
65
66
67
68
69
70
71
72
import torchimport torch.nn as nnclass Char_CNN (nn.Module) : def __init__ (self,num_embeddings,embedding_dim,channel=1 ,feature_size=300 ) : super(Char_CNN,self).__init__() self.embedding = nn.Embedding(num_embeddings,embedding_dim) self.feature_size = feature_size self.cnn1 = nn.Sequential( nn.Conv1d(channel,24 ,(3 ,embedding_dim),padding=1 ), nn.BatchNorm2d(24 ), nn.ReLU(inplace=True ), nn.MaxPool2d(2 ) ) self.cnn2 = nn.Sequential( nn.Conv1d(24 ,12 ,1 ), nn.BatchNorm1d(12 ), nn.ReLU(inplace=True ), nn.Conv1d(12 ,48 ,3 ,padding=1 ), nn.BatchNorm1d(48 ), nn.ReLU(inplace=True ), nn.MaxPool1d(2 ), ) self.linear1 = nn.Sequential( nn.Linear(feature_size//4 *48 *2 ,128 ), nn.Dropout(0.3 ), nn.BatchNorm1d(128 ), nn.ReLU(inplace=True ) ) self.linear2 = nn.Sequential( nn.Linear(128 ,2 ), nn.Dropout(0.3 ), nn.BatchNorm1d(2 ), nn.Softmax() ) def forward (self,x) : """ x: (batch_size,feature_size),默认为channel为1 (batch_size,channel,feature_size) ,channel要与初始化时一致 """ if x.dim()==2 : x = torch.unsqueeze(x,1 ) sample_nums = x.shape[0 ] x = self.embedding(x) cnn1_output = self.cnn1(x) cnn1_output = torch.squeeze(cnn1_output) cnn2_output = self.cnn2(cnn1_output) cnn1_output = cnn1_output.view(sample_nums,-1 ) cnn2_output = cnn2_output.view(sample_nums,-1 ) cnn_output = torch.cat([cnn1_output,cnn2_output],dim=1 ) x = cnn_output.view(sample_nums,-1 ) x = self.linear1(x) x = self.linear2(x) return x
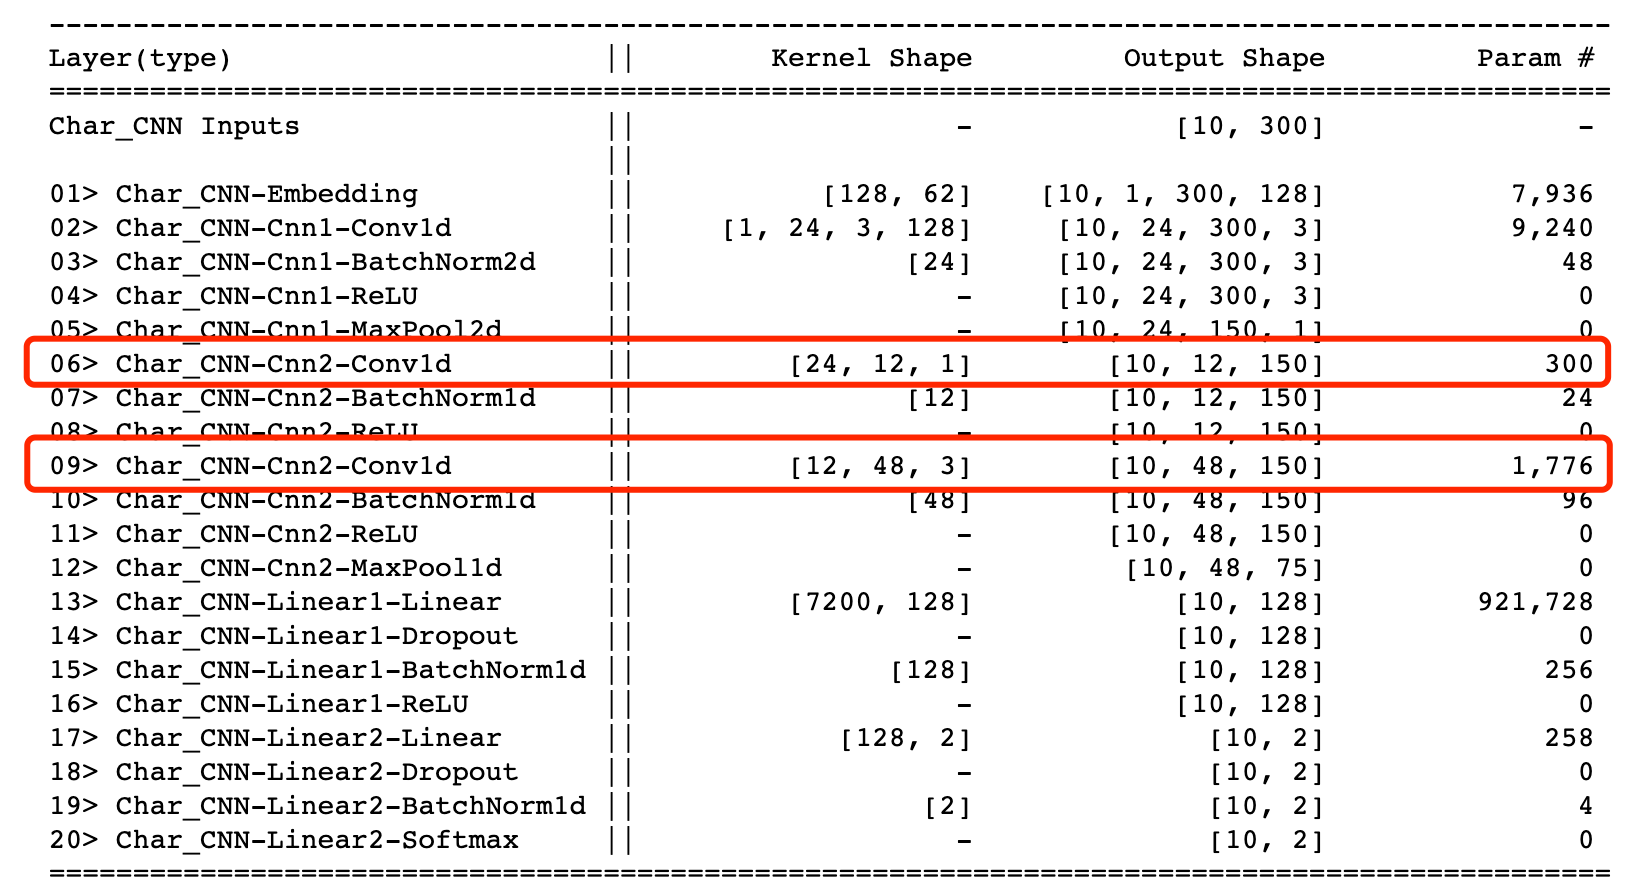
使用torchSummary进行参数可视化:
可以看出,优化后的形成的两个卷积总参数个数为2076,远远小于原来的3504。
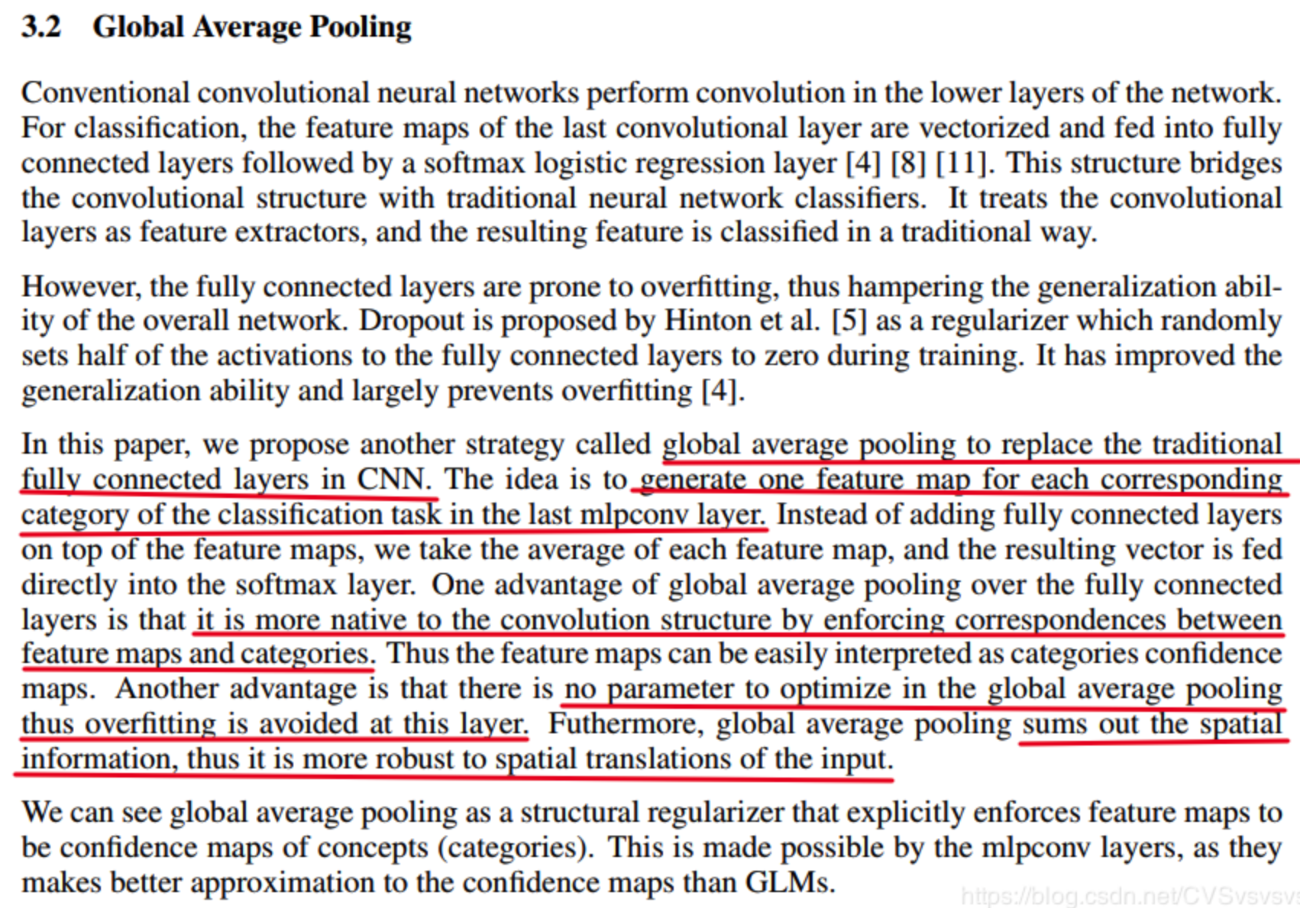
使用全局平均池化层替代全连接 在一般的卷积神经网络中,一般将卷积层作为特征提取模块进行特征提取,然后再在接上全连接网络进行特这个组合,将维度映射到目标维度。但是因为全连接神经网络具有需要固定输入长度、参数量巨大 等缺点,因此出现了各种方式对全连接网络进行取代,最常用一种方式是在《Network In Network》论文中提出的使用global average pooling(简称GAP)替代全连接网络的方法。
方法
如果要预测K个类别,在卷积特征抽取部分的最后一层卷积层,就会生成K个特征图,然后通过全局平均池化就可以得到 K个1×1的特征图,将这些1×1的特征图输入到softmax layer之后,每一个输出结果代表着这K个类别的概率(或置信度 confidence),起到取代全连接层的效果。
优势 使用global average pooling取代全连接网络具有如下优势:
全局平均池化层不需要参数,从而有效防止全连接网络中产生的过拟合问题。
使网络不必再固定输入数据大小.
pytorch实现 在pytorch中并没有直接的global average pooling实现,但可以通过使用adaptive_avg_pool函数实现,该函数可以指定输出的向量形式,指定各个feature map的都转化成为1维即可实现相同效果。下面以二维数据为例:
1 torch.nn.functional.adaptive_avg_pool2d(a, (1 ,1 ))
对比实验 使用global average pooling继续对上面的Char_CNN网络进行优化,优化后的网络如下所示:
1
2
3
4
5
6
7
8
9
10
11
12
13
14
15
16
17
18
19
20
21
22
23
24
25
26
27
28
29
30
31
32
33
34
35
36
37
38
39
40
41
42
43
44
45
46
47
48
49
50
51
52
53
54
55
56
57
58
59
60
61
62
63
64
65
66
67
68
69
70
71
72
73
74
75
76
import torchimport torch.nn as nnclass Char_CNN (nn.Module) : def __init__ (self,num_embeddings,embedding_dim,channel=1 ,feature_size=300 ) : """ Parameters: ------------- channel: 深度、通道数 feature_size: 特征向量大小 """ super(Char_CNN,self).__init__() self.embedding = nn.Embedding(num_embeddings,embedding_dim) self.feature_size = feature_size self.cnn1 = nn.Sequential( nn.Conv1d(channel,24 ,(3 ,embedding_dim),padding=1 ), nn.BatchNorm2d(24 ), nn.ReLU(inplace=True ), nn.MaxPool2d(2 ) ) self.cnn2 = nn.Sequential( nn.Conv1d(24 ,12 ,1 ), nn.BatchNorm1d(12 ), nn.ReLU(inplace=True ), nn.Conv1d(12 ,48 ,3 ,padding=1 ), nn.BatchNorm1d(48 ), nn.ReLU(inplace=True ), nn.MaxPool1d(2 ), ) self.prepare_output_cnn1 = nn.Sequential( nn.Conv1d(24 ,2 ,1 ), nn.BatchNorm1d(2 ), nn.ReLU(inplace=True ), ) self.prepare_output_cnn2 = nn.Sequential( nn.Conv1d(48 ,24 ,1 ), nn.BatchNorm1d(24 ), nn.ReLU(inplace=True ), nn.Conv1d(24 ,2 ,1 ), ) self.global_avg_pool = nn.AdaptiveAvgPool1d(1 ) def forward (self,x) : """ x: (batch_size,feature_size),默认为channel为1 (batch_size,channel,feature_size) ,channel要与初始化时一致 """ if x.dim()==2 : x = torch.unsqueeze(x,1 ) sample_nums = x.shape[0 ] x = self.embedding(x) cnn1_output = self.cnn1(x) cnn1_output = torch.squeeze(cnn1_output,-1 ) cnn2_output = self.cnn2(cnn1_output) cnn1_pre_out = self.prepare_output_cnn1(cnn1_output) cnn2_pre_out = self.prepare_output_cnn2(cnn2_output) cnn1_pre_out = self.global_avg_pool(cnn1_pre_out) cnn2_pre_out = self.global_avg_pool(cnn2_pre_out) x = torch.squeeze(cnn1_pre_out+cnn2_pre_out,-1 ) x = nn.Softmax()(x) return x
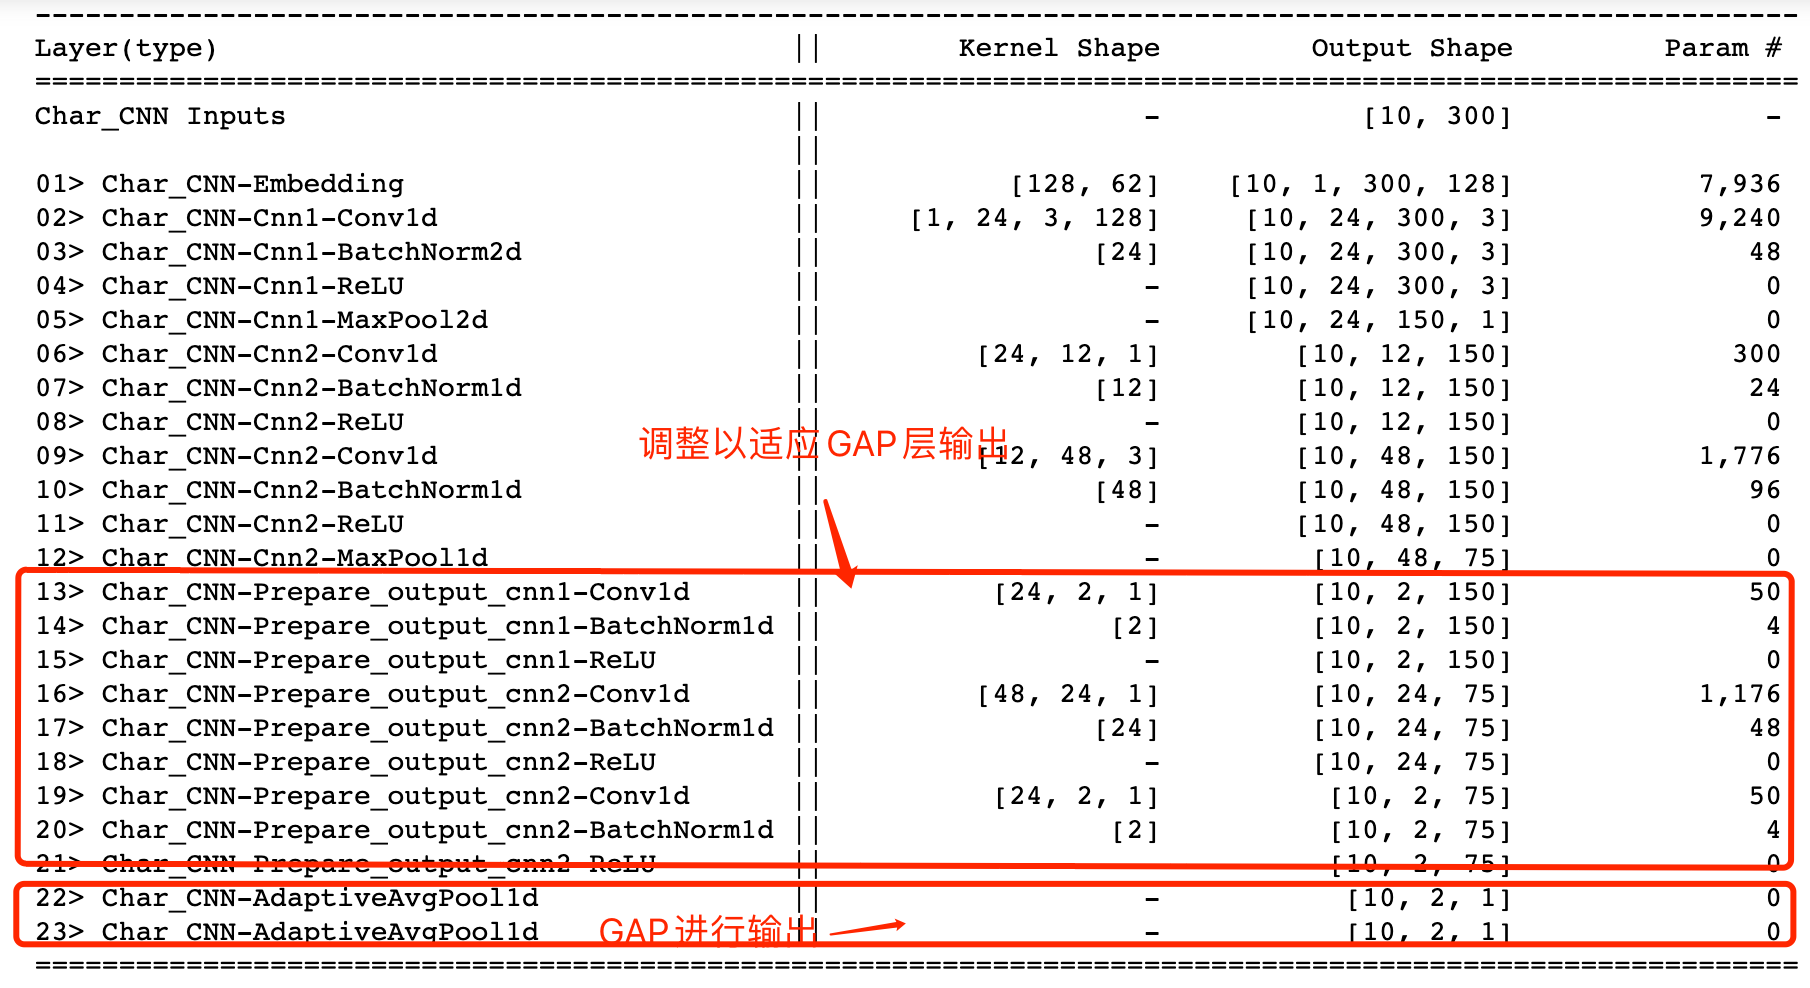
使用torchSummaryM查看模型参数可以发现,虽然增加了一部分CNN网络以适应使用GAP输出额外产生了一部分参数,但是这部分参数与直接使用全连接网络相比,完全不在一个数量级上。
残差块使用 现如今只要用到比较深层的神经网络,那么网络中必不可少的就会使用残差结构,那么什么是残差结构呢?残差结构来源于2014年提出的VGG NET,在该网络中为了解决模型深度越来越深造成的信息衰减问题 ,作者使用将原始的输入与卷积进行特征提取后的向量共同进行输出使模型不出现效果的衰减 的做法被称为残差结构。残差网络中最有普遍借鉴意义的结构就是残差块,因此本文中只对残差块做重点介绍。
优势 理论上可以使模型深度达到无限深而不出出现衰减问题。
原理 残差块可表示为:
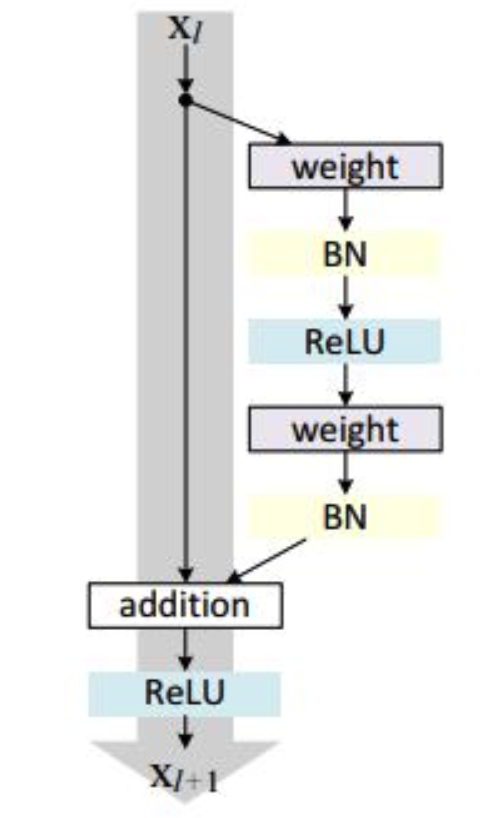
残差块分成两部分直接映射部分和残差部分。$x_l$是直接映射,反应在下图中是左边的曲线;$F(x_l,W_1)$是残差部分,一般由两个或者三个卷积操作构成,即下图右侧包含卷积的部分。
从信息论的角度讲,由于DPI(数据处理不等式)的存在,在前向传输的过程中,随着层数的加深,Feature Map包含的图像信息会逐层减少,而ResNet的直接映射的加入,保证了$l+1$层的网络一定比$l$层包含更多的图像信息。
残差块的基本结构如下图所示:
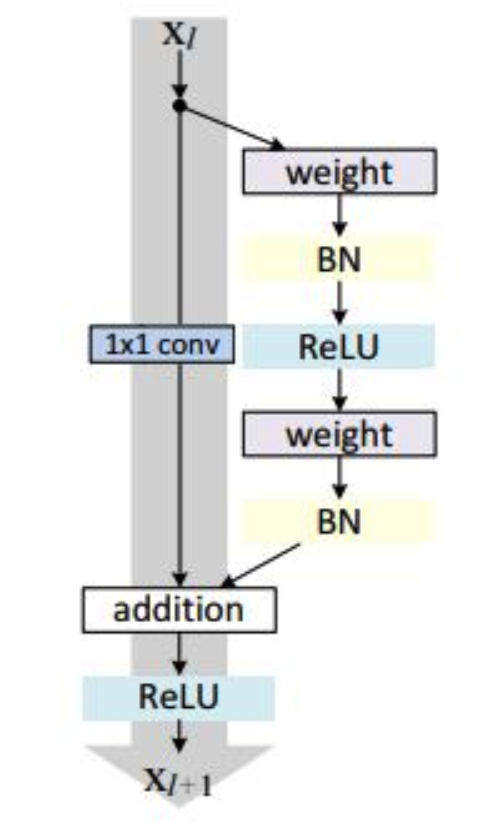
其中weight表示卷积操作,addition是指单位加操作。
在卷积神经网络中经常会出现的问题是$xl$和$x {l+1}$的featuremap的维度是不同的,因此如果出现了这种情况就可以采用前面我们提到过的1*1卷积核进行降channel技巧来保持二者维度一致。
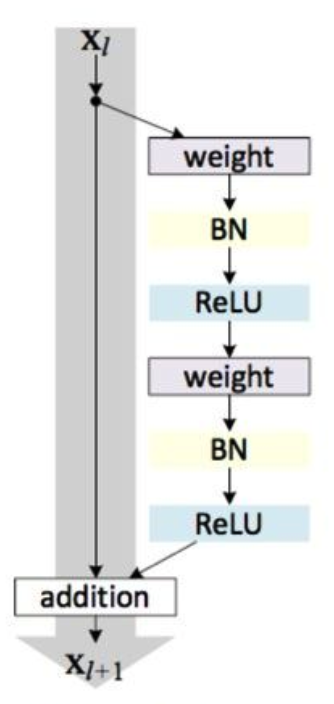
经过文章作者的反复试验,证明将relu函数放在残差模块可以提高精度,因此出现了残差单元的另一种实现:
pytorch实现 这里采用第三种网络结构进行完善,使用pytorch实现如下:
1
2
3
4
5
6
7
8
9
10
11
12
13
14
15
16
17
18
19
20
21
22
23
24
25
26
27
28
29
class Res_block (nn.Module) : def __init__ (self,input_channel,output_channel) : """ input_channel: 输入通道数 output_channel: 输出通道数 """ super(Res_block,self).__init__() self.input_channel = input_channel self.output_channel = output_channel self.res = nn.Sequential( nn.Conv1d(input_channel,output_channel,3 ,padding=1 ), nn.BatchNorm1d(output_channel), nn.ReLU(), nn.Conv1d(output_channel,output_channel,3 ,padding=1 ), nn.BatchNorm1d(output_channel), nn.ReLU() ) if input_channel!=output_channel: self.prepare_concat = nn.Conv1d(output_channel,input_channel,1 ) def forward (self,x) : res = self.res(x) if self.input_channel!=self.output_channel: res = self.prepare_concat(res) x += res return x
深度可分离卷积使用 深度可分离卷积来源于2016提出的Xception ,是指将正常使用的卷积核分离成depthwise(DW)和pointwise(PW)两个部分 ,Depthwise Convolution负责使用负责各个通道内部的特征提取,Pointwise Convolution负责跨通道的特征提取,从而降低运算量和计算成本。
原理 传统卷积
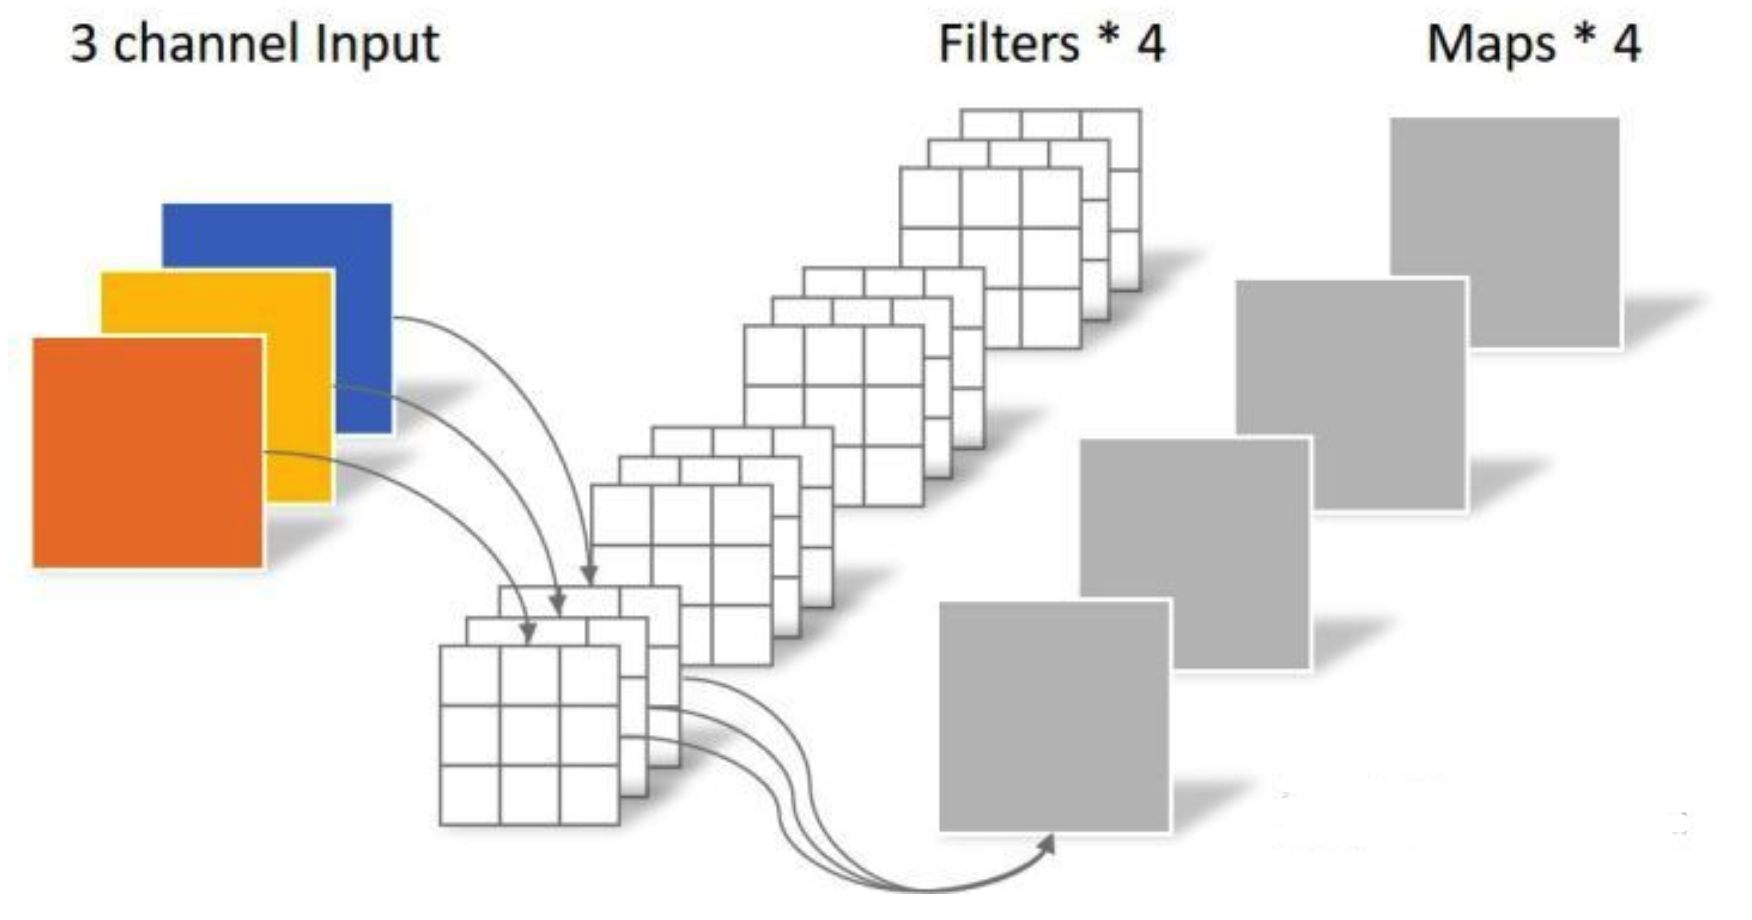
这里以原始输入为(3,5,5)为例,使用传统的卷积方式进行卷积,使用通道数为5的(3,3)的卷积进行卷积层进行卷积(padding保持W、H不变),经过该卷积后,输出尺寸为(4,5,5)
最终该卷积层参数为:
深度可分离卷积
将上面的卷积核转化为两部分进行:
Depthwise Convolution
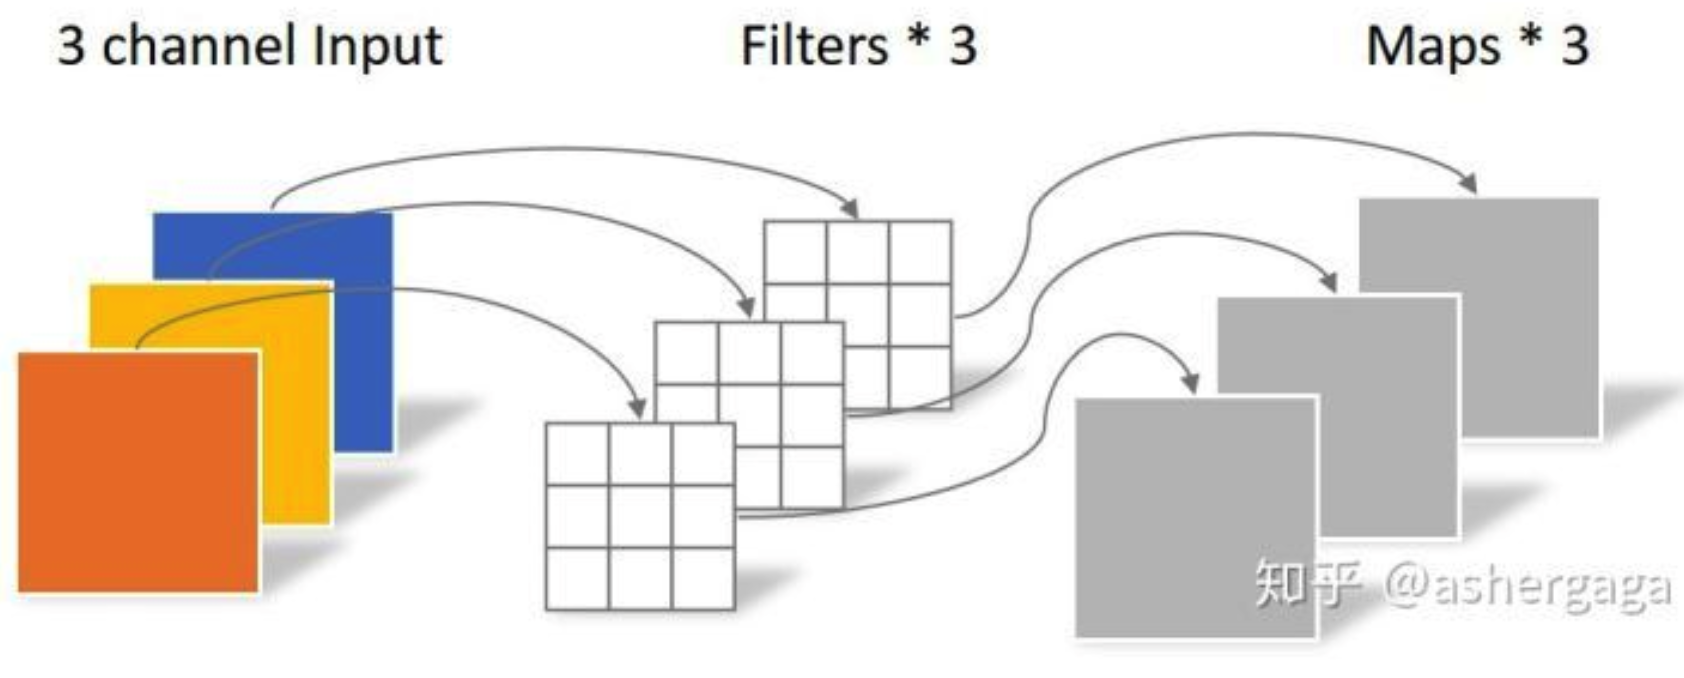
Depthwise Convolution的一个卷积核负责一个通道,一个通道只被一个卷积核卷积,即使用M个(3,3)的卷积核进行一对一输入M个通道,不求和,分别生成M个结果 。对于(3,5,5)的原始输入数据,DW采用通道数为3的(3,3)卷积核进行,该卷积完全是在二维平面内进行,卷积核的数量与上一层的通道数相同 (通道和卷积核一一对应)。所以一个三通道的图像经过运算后生成了3个Feature map,如下图所示。
DW卷积核参数个数为:
注意:这里由于是一一对应因此参数综述并不是3*3*3*3
Depthwise Convolution完成后的Feature map数量与输入层的通道数相同,无法扩展Feature map 。而且这种运算对输入层的每个通道独立进行卷积运算,没有有效的利用不同通道在相同空间位置上的feature信息 。因此需要Pointwise Convolution来将这些Feature map进行组合生成新的Feature map.
Pointwise Convolution
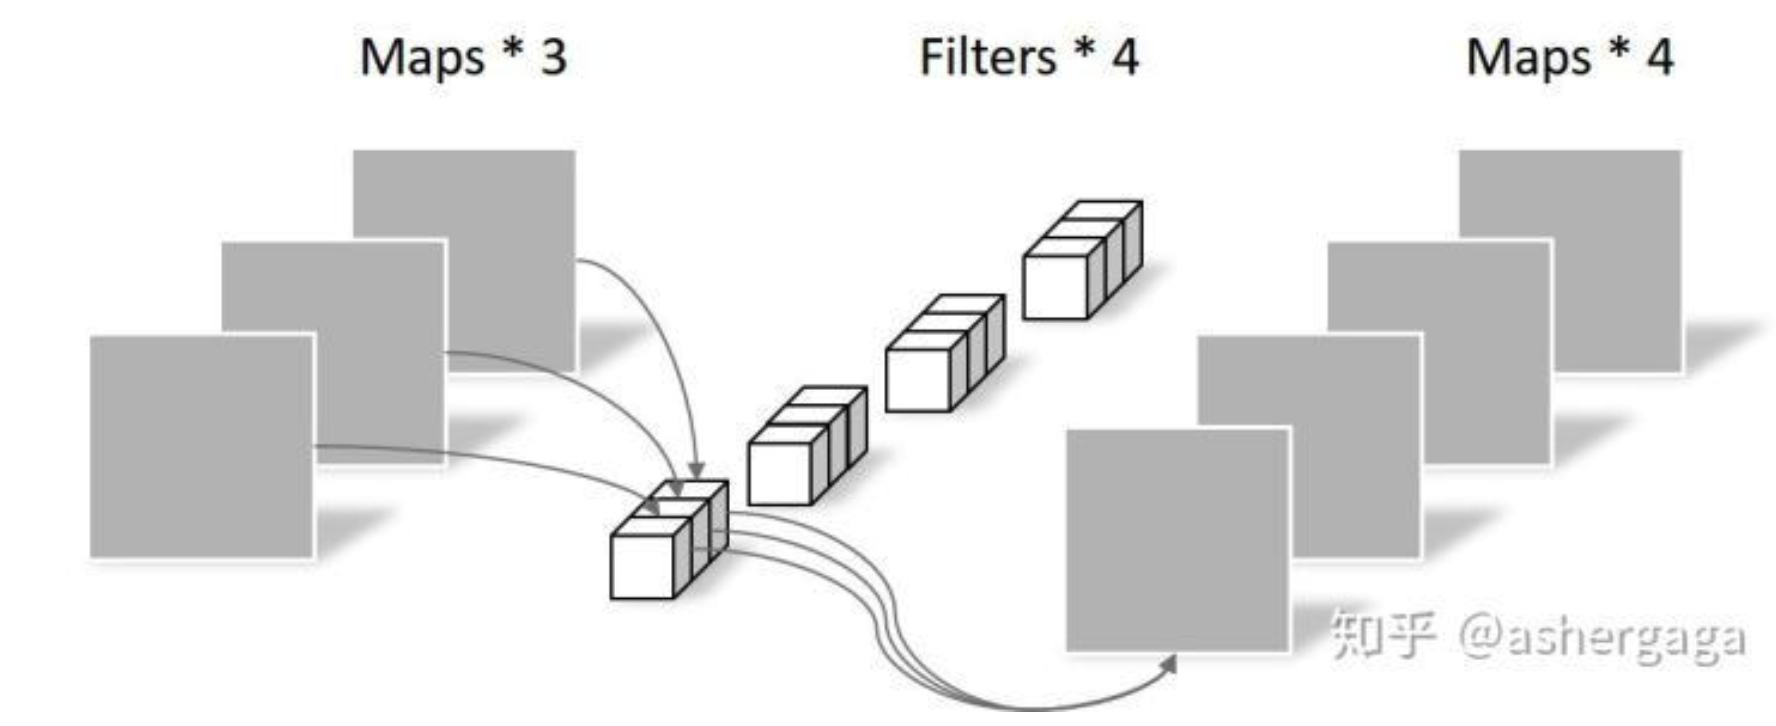
Pointwise Convolution的运算与常规卷积运算非常相似,它的卷积核的尺寸为 1×1×M,M为上一层的通道数 。所以这里的卷积运算会将上一步的map在深度方向上进行加权组合,生成新的Feature map 。有几个卷积核就有几个输出Feature map.
PW部分的参数个数为:
采用深度可分离卷积的参数总量为:
可以明显看出,深度分离卷积的参数个数远远小于传统的卷积方式。
PyTorch实现 对于深度可分离卷积的实现关键是Deepthwise卷积 的实现,而在pytorch 0.4以后的版本中在卷积层函数中加入了接口来方便这一实现。在新版本的pytorch中,加入了groups参数 ,该参数默认为1,意思是将输入分为一组,此时是常规卷积,当将其设为in_channels时,意思是将输入的每一个通道作为一组,然后分别对其卷积 ,输出通道数为k,最后再将每组的输出串联。
1 class torch .nn .Conv2d (in_channels, out_channels, kernel_size, stride=1 , padding=0 , dilation=1 , groups=1 ,bias=True)
而对于Pointwise卷积的实现则是一个标准的1*1卷积网络,因此深度可分离网络的pytorch实现如下:
1
2
3
4
5
6
7
8
9
10
class Dp_Net (nn.Module) : def __init__ (self,input_channel,output_channel) : super(Dp_Net,self).__init__() self.depthwise = nn.Conv2d(input_channel,input_channel,3 ,padding=1 ,groups=input_channel) self.pointwise = nn.Conv2d(input_channel,output_channel,1 ) def forward (self,x) : x = self.depthwise(x) x = self.pointwise(x) return x
使用torchSummaryM进行参数可视化:
参考文献


